Hello all!
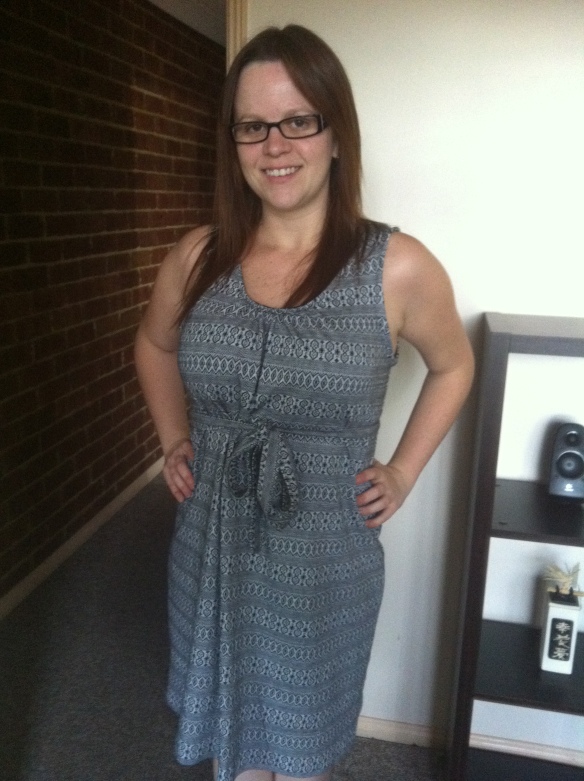
As per my complaints yesterday, the weather is still horrible, but I decided to wear my new dress anyway…because I was so excited to have finally made something I am happy to wear!
Now its by no means an exciting dress. Just a comfy, work appropriate dress to add to my wardrobe. I love it, however, for the following reasons:
It fits! As per the first dress I made over the Easter weekend, Lisette patterns are a bit difficult to figure out fit. In my first attempt all my measurements pointed to a size 18, so I made one, and like all size 18s on me it was way too big. This time I just made a 14 as per my normal size, ignoring what the pattern told me of my measurements, and it worked perfectly! It does help that this dress has very little shape (like a pillowcase dress but with real armholes and neckline), but I am pleased nonetheless.
Total materials cost: $5. Yes that’s right, $5! I found the fabric for this in a remnant bin at a second hand store for $3, and the rest of the cost was in binding for the arm and neck holes. I love a bargain!
Its super comfy. Due to my thrifting, this fabric may well have been upholstery type fabric at a glance, but it is sooo super soft I decided to use it for a dress regardless of the chance of someone seeing me and thinking “Hey that woman is wearing my couch cushions!”. I am pleased I did. I like the look and the comfort and I never made the dress with the intention of looking smokin. To tell you the truth I was half expecting another dud project so was just happy to not waste expensive fabric. $3 experiment for the win!
It was super easy to put together. I had no dramas with this pattern at all! It helps that there were no darts or zips or buttons etc. But there was gathering to do and a belt to make with fabric that wanted to curl the other way and I nailed both of these!
I am pleased with my skill with lining up the print. The front and back of the dress are separate pieces, but I cut the fabric so perfectly, and stitched it so well, that the horizontal lines of the fabric blend smoothly from front to back, and there are no crooked lines on the hem or neck. I am so proud of myself!
I made some adjustments to make it better. The belt didn’t like sitting flat so I top-stitched it; this was not in the instructions. I also used twill tape instead of bias binding (the instructions actually called for making matched binding but I didn’t have enough fabric). Whilst I think I did it ‘wrong’ (ie not the most effective way or the way you should for twill), the effect I wanted is there: the twill works better with this fabric than packet bias would have. I would do it slightly different in future (more ‘correct’) but only for the sake of perfection, I think the result would have been the same. Regardless, I am so excited to be confident to make decisions to advance beyond what the pattern and instructions say…yay me!
I got the hem right. I waited overnight and took my time, being sure to pay attention to the horizontal lines on the fabric. Perfect hem this time…woohoo!
So there it is, my first successful garment, with many more sure to come. I am truly loving this new hobby, it really makes me happy 🙂
Pattern used:


Very cute! I love the gray!
Beth
Thankyou! 🙂
Fabulous! And brilliant on not following the instructions when you don’t feel they are quite right (or adding extras such as top-stitching when you think they are right).
If it’s the right fabric for the project then it doesn’t matter what it was “supposed to be”. I have a simple, unlined coat that I made years ago from a second-hand curtain that I still wear now and always get compliments every time I wear it.
Thankyou! And its definitely true about just using a fabric that works. I have been looking at old sheets in second hand stores as well, not just the remnants bin…if they have a cute pattern or a solid colour, why not? 🙂
Really nice! I worry about that too with fabric. Sometimes I go to Ikea and look at their fabric thinking some of it would look cute as a skirt. Then I think, oh by someone probably made curtains for their baby nursery with it!!
Thanks 🙂 Maybe tell yourself that the person with the curtains might be wishing they had made a skirt instead. Cute is cute!
This looks adorable! I like your version so much better — I skipped over this pattern because the photo on the front did not look flattering to me. I think the fabric you chose really works for the drape of this dress. Good find!
I used to make the size from my measurements and get frustrated when it didn’t fit. Now I go by the “finished” measurements printed on the package or on the pattern sheet — which means I usually size down by one but for something with a lot of ease, I go down two sizes. So, I would take your measurements and add however many inches of ease you want (usually 1″ for the bustline and 2″ for hips but YMMV depending on style, fabric, etc) and then compare that to the finished measurements. I have a lot fewer wadders since I started doing it that way.
Thanks for the advice, its really appreciated. The whole learning process is great and its getting even better as people tell me how they got fit to work for them 🙂
Hey, amazing job! It’s very flattering on you! 🙂
thanku 🙂